In the heart of Tanzania, Mount Kilimanjaro stands as Africa’s highest peak, attracting adventurers from around the globe. What many don’t know is that Trekkers on the Shira route not only encounter the breathtaking scenic beauty but also go through one of the less congested paths. Such routes provide an unparalleled experience combined with a unique sense of solitude.
The Shira itinerary, spanning over seven days, boasts a rich tapestry of landscapes, from lush rainforests to the expansive Shira Plateau. Originally serving as a volcanic caldera, this route offers both historical intrigue and geological wonder. According to recent statistics, around 10,000 trekkers annually challenge themselves on this intricate route, underscoring its growing appeal.

7-Day Shira Itinerary: A Detailed Guide to Kilimanjaro
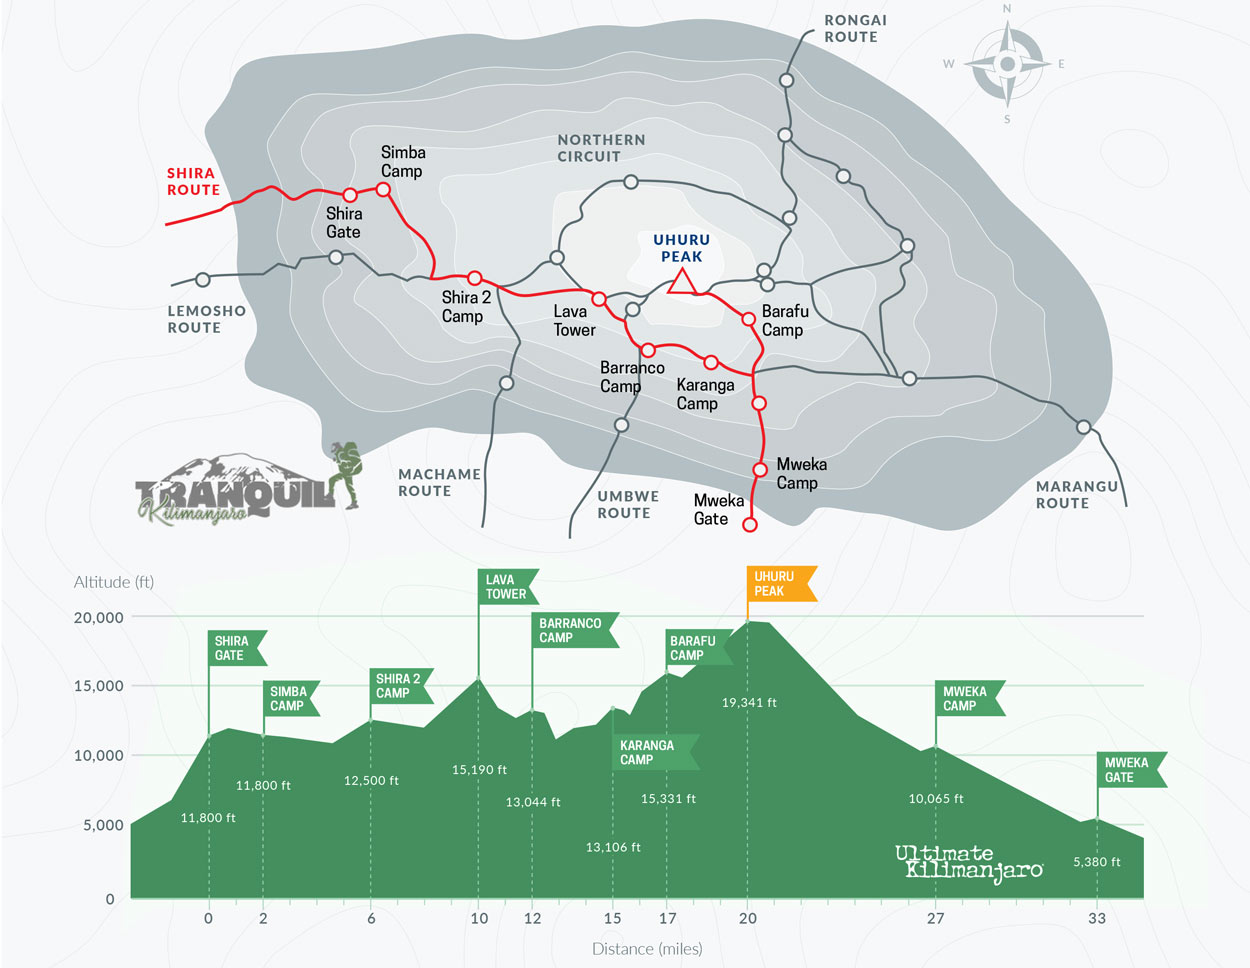
The Shira Itinerary offers an incredible 7-day trek to conquer Kilimanjaro, Africa’s highest mountain. Starting from the western side, it offers breathtaking vistas of vast plains. The journey allows climbers to see diverse landscapes, including lush rainforests and rocky terrains. The Shira route is unique because it starts at a higher altitude, giving trekkers more time to acclimatize. This makes it a preferred choice for many adventure seekers.
The first few days of the trek introduce hikers to beautiful forests and moorlands. Day 1 typically begins at Londorossi Gate, leading to the Shira One Camp. Then, on Day 2, trekkers advance to Shira Two Camp as they venture into the heart of the plateau. Each step reveals stunning views and delightful surprises along the way. These initial days help prepare trekkers for the challenging climb ahead.
The middle days test endurance but reward with stunning scenery and proud achievements. On Day 3, trekkers aim for Lava Tower, a famous landmark that stands like a giant sentinel. It may seem tough, but reaching this point is exhilarating. By Day 4, climbers head to the Barranco Camp, overlooking the breathtaking Great Barranco Wall. These days are crucial in building confidence and momentum for the summit attempt.
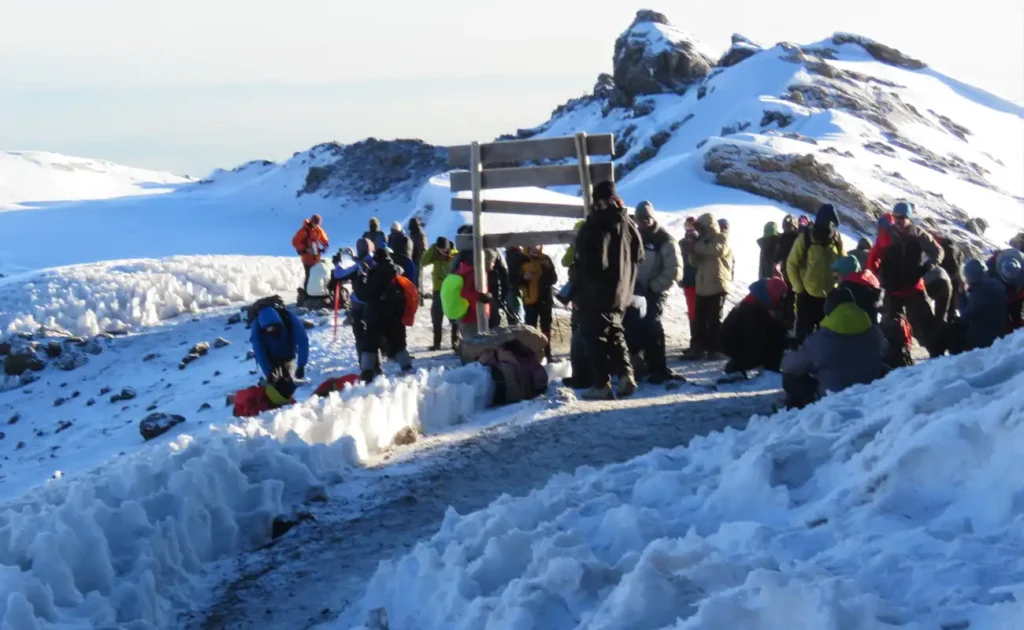
The final days of the Climb are both challenging and rewarding. Day 5 brings climbers to Barafu Camp, the base for the final summit push. After a short rest, Day 6 begins with a midnight ascent to the Uhuru Peak, Kilimanjaro’s summit. The trek ends on Day 7, descending to Mweka Gate, marking the adventure’s completion. This itinerary showcases the true beauty of Kilimanjaro with an unforgettable experience.
10 Things I Wish I Knew BEFORE Climbing Mt Kilimanjaro! | Follow Alice | 4K
Exploring the Route: A Day-by-Day Overview
The first day’s hike on the Shira route is filled with rich forests and wildlife. Starting at Londorossi Gate, the trek leads to Shira One Camp. This initial day helps you adjust to the altitude. It is a relatively easy hike, allowing you to enjoy the surroundings. This day sets the pace for the rest of the journey.
On Day 2, the trail continues across the Shira Plateau, heading towards Shira Two Camp. The terrain begins to change as you leave the lush forests behind. You will encounter vast fields and exotic plants. This day is perfect for taking lots of photos. The hike ends with a beautiful sunset at the Shira Two Camp.
Day 3 takes you from Shira Two to the iconic Lava Tower. The altitude starts to challenge you, but the views are worth it. Walking among the clouds, you get to appreciate Kilimanjaro’s grandeur. The day ends at the Barranco Camp, offering a delightful view of the Barranco Wall. Rest well, as the next day will be a bit more challenging.
Day 4 involves climbing the Great Barranco Wall, starting early to avoid the sun. This part of the hike adds an exciting twist to the journey. After conquering the wall, the trail leads to Karanga Valley Camp. The varied path keeps the trek engaging. By the end of this day, you will feel closer to the mountain’s summit.
Acclimatization on the Shira Route
Trekking on the Shira route involves gradual acclimatization to ensure safety. Climbing to high altitudes can significantly affect your body, so walking at a steady pace is essential. Staying well-hydrated and eating nutritious meals aid in adjusting to the height. The route’s slower ascent allows the body to adapt efficiently, reducing the risk of altitude sickness. Experiencing diverse terrains during the climb keeps trekkers engaged while acclimating.
The design of the Shira route includes strategic stops that promote acclimatization. One key acclimatization spot is the Lava Tower, standing at 15,190 feet. Spending extra time at such elevations enables climbers to adjust comfortably. Despite the challenging conditions, these stops offer magnificent views. Such planning enhances the overall trekking experience.
Proper acclimatization depends on several factors, including age, fitness, and past high-altitude experience. Even seasoned hikers may find some climbs difficult, so paying attention to the body’s signals is crucial. Common symptoms such as headaches or nausea need immediate attention. Listening to guides and making necessary adjustments ensures a safer trek. The Shira route’s pacing allows for these important measures.
Group dynamics also play a vital role in acclimatization. Trekking with companions can boost morale and support. Sharing the experience with fellow hikers provides comfort and encouragement. Working together, the team reaches higher grounds with increased confidence. The journey becomes not just about reaching the peak, but also about forming friendships and bonds.
Essential Trekking Gear for the Shira Route
Trekking on the Shira route requires careful packing of essential gear. Proper clothing is crucial to withstand varying weather conditions. Layers work best as temperatures can fluctuate from warm valleys to cold peaks. A reliable waterproof jacket is a must. It protects against unexpected rain and harsh winds.
Comfortable and sturdy footwear is very important. Good hiking boots provide the necessary support and grip. Make sure they are well broken in before the trip. This prevents blisters and ensures a smoother trekking experience. Don’t forget to pack warm socks.
Staying hydrated is key to a successful climb. Carry enough water bottles or a hydration system that is easy to use while walking. A good water filter or purification tablets is wise for refilling from freshwater sources. High-energy snacks like nuts and granola bars keep you fueled throughout the trek. These items are lightweight yet packed with nutrients.
The right gear enhances safety and comfort during the trek. A headlamp with extra batteries is essential for early starts or late finishes. Trekking poles can greatly reduce the strain on your knees. Additionally, a first aid kit with basic supplies should always be on hand. Don’t overlook the importance of a good quality backpack to carry all your essentials. These items ensure you’re prepared for the challenges of the Shira route.
Health and Safety Considerations on the Shira Route
Ensuring health and safety on the Shira route involves several key practices. Trekking at high altitudes can lead to altitude sickness. Recognizing symptoms like headaches, dizziness, and nausea is crucial. If these occur, it’s important to descend immediately. Never ignore the signs, as they can worsen quickly.
Hydration is vital for maintaining health during the climb. Dehydration can exacerbate altitude sickness and reduce physical performance. Carry a sufficient water supply and drink regularly. Lightweight water bottles and hydration systems make this easier. Adding electrolytes to the water can also help.
Proper nutrition and rest are essential for keeping up stamina. High-energy food and snacks sustain energy levels. Ensure a balanced diet with adequate carbohydrates, proteins, and fats. Each night, resting sufficiently helps the body recover. It’s important to prioritize sleep and relax after each day’s trek.
Safety equipment and practices further enhance trekking experiences. A reliable first aid kit should include bandages, antiseptics, and medications. Guides carry essential gear and offer support in emergencies. Trekking in groups enhances safety through mutual assistance. Listening to guides and sticking to the group is always wise. These measures ensure a safe and enjoyable climb on the Shira route.
Why Choose the Shira Route: Comparing Kilimanjaro Routes
The Shira route offers a unique and less crowded path to Kilimanjaro’s summit. Unlike the more popular routes, Shira starts at a higher altitude, giving trekkers an advantage in acclimatization. This route traverses diverse landscapes, from lush forests to rocky terrains. The scenic beauty is unmatched, making each day of the trek a visual delight. These factors make Shira a standout choice for adventurers.
Compared to the Marangu route, the Shira route is more challenging but also more rewarding. Marangu, known for its hut accommodations, is the only route offering dormitory-style sleeping arrangements. In contrast, Shira requires camping, adding to the adventure. The higher starting point of Shira leads to better acclimatization. Hence, trekkers often find it easier to adjust to the altitude over time.
The Machame route, another popular choice, is known as the “Whiskey Route” due to its tougher climb. While Machame also offers stunning scenery, it can get quite crowded. Shira, being less traveled, provides a quieter and more peaceful trekking experience. Both routes eventually merge, allowing trekkers on Shira to enjoy the same breathtaking vistas as those on Machame. This combination of solitude and beauty often tips the scale in favor of Shira.
Trekkers choosing the Rongai route appreciate its gradual ascent and lesser traffic. However, Rongai lacks the varied landscapes that Shira boasts. The panoramic views of the Shira Plateau are a highlight not found on other routes. These distinct features make Shira an attractive option for those seeking both challenge and beauty. When comparing Kilimanjaro routes, Shira stands out for its perfect blend of difficulty, scenic routes, and fewer crowds.
Key Takeaways
- The Shira route offers stunning and diverse landscapes.
- It begins at the Londorossi Gate and ends at Mweka Gate.
- Acclimatization is gradual, making the climb easier.
- Highlights include Shira Plateau, Lava Tower, and Barranco Wall.
- The journey culminates at Uhuru Peak for a rewarding finish.


